


 v
v


 v
v


Tempo Gelandewagen Operation Manual (English Translation)
The Tempo Gelandewagon is a very special vehicle. Its mobility over all terrain and its extremely strong engine power in relation to its own weight enable performance that is generally not achievable with a wheel-driven motor vehicle. Of course, the driving technology must be adapted to these facts, and for this reason alone it is urgently recommended that every driver entrusted with driving this vehicle familiarises himself with these instructions before the vehicle is put into operation. This booklet also provides instruction about the maintenance of the Tempo-Gelandewagen and its individual parts. This part of the instructions must also be carefully observed. The Tempo-Gelandewagen can only fully fulfill its purpose if it is always ready to start and fully operational in any terrain. Careful maintenance of all parts, for which this booklet gives the necessary practical tips and advice, is essential.
Happy driving!
Description of the individual parts and their maintenance.
The whole structure of the Tempo cross-country vehicle is kept simple. Both of its motors are attached to the chassis tube through holes in the differential housing. While the rear engine assembly is firmly connected to the chassis tube, the front engine assembly can move at a certain angle around the chassis tube. This enables the substructure to move, which practically allows all four driving wheels full traction with the ground in almost every terrain (see drawing no. 1).
Engine
Each of the two engines can work independently and includes a separate starter, a gearbox and a differential with all auxiliary parts, such as carburettor, exhaust, clutch, etc. The engines are lubricated by the gasoline-oil mixture (petroil lubrication). Petroil is mixed in a ratio of 15: 1 (to 15 litres of petrol 1 litre of oil) during the first 800km, and later 20: 1 when the engines have run in. It is important to ensure that the mixture is carried out in a clean gas barrel before filling the fuel tank to ensure the oil and petrol have mixed consistently. Dirt and water must be kept out of the fuel system.
All branded petrols and oils are more or less suitable. Our experience is based on Shell petrol and Shell oil 4x. These two products can therefore be highly recommended.
The more carefully the machines are run in, the better it will do its job later and the longer its operating life will be. The vehicle should therefore not be driven faster than the maximum speed of 30 km / h prescribed during the break-in period in the first 800 to 1000 km. The following top speeds must also be observed after the running-in period:
1st Gear – 15kph
2nd Gear – 25kph
3rd Gear – 35kph
4th Gear – 65kph
Starter
The starters are combined starter, lighting and ignition machines that are directly connected to motors. Apart from regular cleaning of carbon dust (every 2-3000 km) and replacement of the carbon brushes, depending on the wear, you do not need any special maintenance. As far as possible, they are left to do the work. If any intervention is required in the electrical systems, we recommend this is only done by a specialist, preferably at the nearest Bosch office.
Each starter is individually pressed by pressing the corresponding starter button in the cab (left button for the rear, right button for the front machine).
Transmission
The gearboxes are no less demanding when it comes to their care. The main requirements are clean switching with simultaneous disengagement and regular addition of the gear oil.
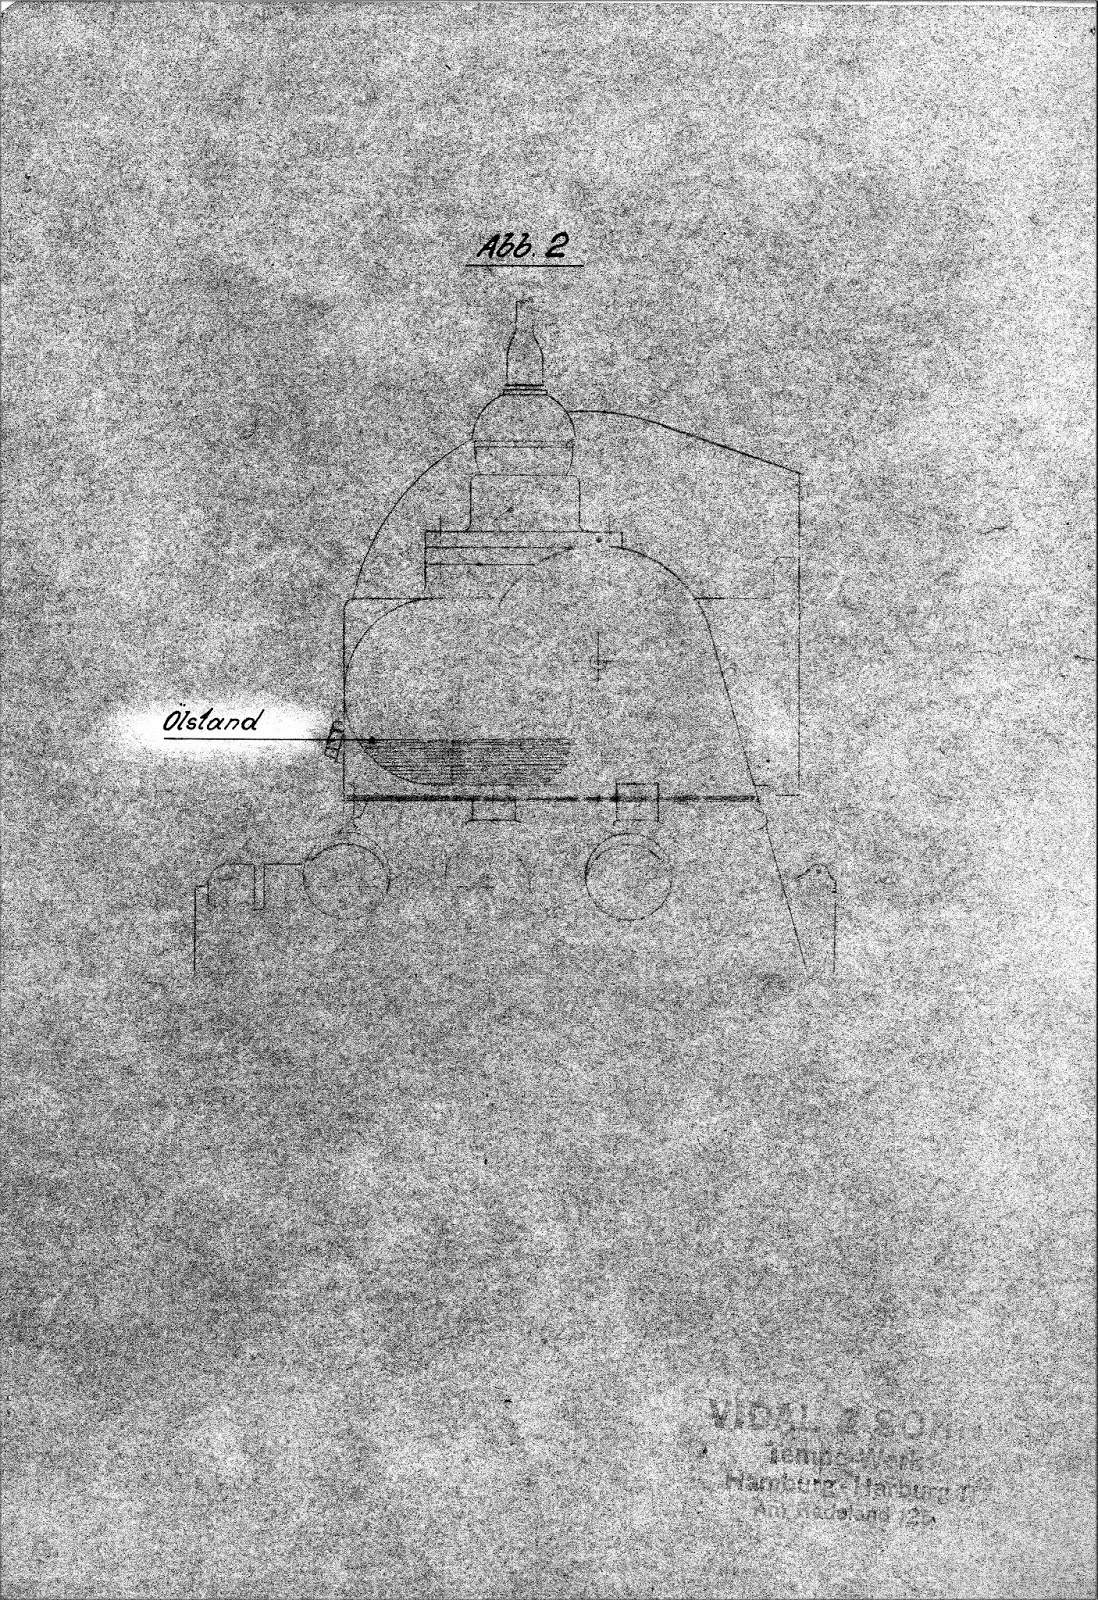
Shell-Retinax is best used for the lubrication, which is filled through the screw in the upper transmission cover until it has reached the level of the control screw on the front part of the gearbox (see drawing no.2). Transmission oil should be checked and topped up every 14 days if possible. Too much oil, just like too little, is not appropriate here.
Gear shift
The location of the individual gear shifters can be seen in the attached drawing No. 3. The reverse gear is secured by a drop lever.
Shifting is done by disengaging the clutch and firmly moving the gear lever to the desired gear. Of the two shift levers next to the driver's seat, the front lever applies to the front and the rear lever applies to the rear machine. If both machines are used together, both shifters must be linked via the clip mechanism and operated with one handle.
Clutch
The clutch between the engine and transmission are used to connect and disconnect power from the engine. The clutch disconnects the transmission as soon as the driver steps on the clutch pedal. This pedal (left foot pedal in the driver's seat) operates both clutches at the same time. The levers on the clutch housings that are activated must always have a clearance of approx. 5 mm at their lower ends. As soon as you are under tension (due to the coupling ropes attached to this point), the clutch disks loosen, which leads to premature wear and consequent failure of the clutch. The same can happen if the driver leaves his foot on the clutch pedal after switching and clutching, even if only slightly, or tries to slip over terrain by letting the clutch slip when it would be right to shift to the next lower gear. To readjust the release lever, first loosen the counter nut to the set screw (see drawing no. 4a) and then screw it in or out, depending on whether the play of the lever should be increased or decreased.
Duplex chain drive case
The clutch housings need oil to lubricate the duplex chain, which connects the motor and gearbox via the clutch. Here too, Shell-Retinax is best used, which is filled through the filler opening at the top of the clutch housing up to the level of the control opening (b) on the side. Since too much oil affects the function of the clutch, this oil level must be observed as closely as possible.
The differential gear connection is made by a strong roller chain, the so-called drive chain. Here, too, Shell-Retinax for lubrication. The control opening, which also determines the oil level, is located at the front of the differential housing.
Re-tensioning the chain
The drive chain can be replaced easily after removing the upper side chain case cover, if you connect the old and new chains for this purpose and, by pulling out the old chain, it will automatically introduce the new one. However, if the old chain is broken, the entire left front swing arm including the lower (large) chain box cover at the side must be removed, after which the differential housing is exposed for further interventions.
Differentials
Each differential is driven by the drive chain via a chain wheel that is screwed onto the differential cage. In this there are the balancing wheels, which are arranged in planetary form. The lubrication is carried out together with the drive chain with Shell-Retinax oil.
Carburetor
The carburetors are fitted with the nozzle size specified under "technical details". After about 1000 to 2000 km, then a smaller main jet can be used. Both carburetors are operated by a common throttle (middle foot pedal in front of the driver's seat). It is important to thoroughly clean the air filter every 500 km, otherwise the mixture will not receive enough air and the fuel consumption will increase.
Fuel supply
The fuel supply can be switched off fully by the tap under the dashboard for the front tank and below the rear. This is recommended when parking the vehicle overnight or for a long time.
Exhaust
The muffler of each of the two motors is removable and is best cleaned every 5000 km (2-3 months) after pulling out the steaming brush.
Chassis
On the chassis, to which the body is firmly connected, there are a number of lubrication points that have to be lubricated at regular intervals (at least every 14 days if the vehicle is used frequently). Thick-flowing gear oil is used, preferably Shell-Retinax.
The maintenance of the chassis also includes the continuous inspection of all screws and nuts, especially the moving parts, for tightness and, if necessary, their immediate tightening.
Axles
All four axles are driven. They are special cardan shafts that run in support tubes designed as low-swing arms. There are two joints on each axis, which must be lubricated with thick-flowing gear oil (Shell-Retinax) every 6-8 weeks. For this purpose, the screw nipples (see drawing 5a) must be removed beforehand.
If necessary, the PTO shafts are removed by simply pulling the entire axle body out of the support tubes, which must be brought into a horizontal position after the springs have been loosened.
Springs / Suspension
The springs are attached to the swing arm by means of bolts in the differential housing and with plates and bolts. To loosen the upper bolts (on the differential) you need a 17.5 mm spanner.
Brakes
The brakes, both the foot brake (right foot pedal in front of the driver's seat) and the hand brake, are applied to all four wheels. They are designed as inner shoe brakes, and the transmission of braking force takes place from the foot or hand lever on the brake cams through cables running in spiral hoses. The brakes are adjusted either by adjusting the cable holder on the brake cable or by the two set screws in the driver's seat or, for the front brake, by the set screw in front of the bulkhead.
Wheel hubs
The wheel hubs each have 2 sturdy roller bearings. The hubs are filled with Shell roller bearing grease during assembly, which, depending on the use of the vehicle, is sufficient for 1/2 - 3/4 years. Refilling may only be carried out by a specialist, since the installation requires special care and expertise.
Steering
The steering is a worm wheel segment control. Lubrication is provided by the grease nipple at the bottom of the housing. If the dead gear (play) of the steering wheel becomes too large after a while, you can loosen the nuts that connect the lower part of the housing to the upper one a little, so that the dead gear can be adjusted by adjusting the eccentrically designed guide bush for the segment shaft.
The adjusting screw for the control shaft is also located at the lower end of the wheelhouse. If adjustments are required, the best thing to do is to ask the Tempo service representative.
To extend control to the rear wheels for particularly tight curves or in the field, a control shaft leads from the front to the rear unit. By moving the lever next to the driver's seat to the front, the rear pair of wheels is steered in such a way that when the front wheels are turned to the right, the rear wheels turn to the left and vice versa. By moving the lever backwards, the steering of the rear wheels is switched off again. Switching from front wheel steering to four wheel steering can only be done with the wheels pointing straight ahead.
Dashboard
The switches for both engines are located on the dashboard. In the middle is the light switch, the individual settings of which are as follows:
1 = Parking light
0 = light off
2 = Illuminated light (city light)
3 = Headlights
The light switch position allows the ignition key to be inserted, which is turned to the right to switch on the ignition. Switching off is achieved by turning the key to the left. Remove the key when leaving the car.
The speedometer is located above the light switch. The switch on the right is for switching the front engine ignition on and off. The switch to the left of it for the same purpose for the rear motor.
The switch located on the top left next to the speedometer controls the charging of the battery by the two alternators, charging the front battery with the right-hand position, and the rear battery with the left-hand position. When driving with only one engine, the switch must always be switched to the running motor. When running both engines, the alternator should be switched between left and right changed occasionally so that both batteries can be charged.
Fuse box
The fuse box is located under the hood next to the fittings. It is used to hold the fuse (15 amps). It is advisable to always carry some of these fuses as a replacement.
Battery
Both engines are powered by a battery located under the front bonnet. The same can be charged by either the front engine or the rear engine alternator (see "dashboard"). The battery requires regular care and maintenance if it is to be always ready to start. It must be checked for acid density and acid level at least every 4 weeks. It is best to leave this work to a professional, and, if necessary, to charge it at a special power source. Do not confuse the cables when reinserting them! Grease the battery clamp and the connection under the lid well with Shell high-pressure grease red so that they are not eaten away by the acid.
DRIVING INSTRUCTIONS
Despite its double drive units, the whole structure of the Tempo-Gelandewagen is very simple and accordingly easy to drive, especially if the following regulations are observed.
It can be driven with both engines together, or also, either with the front or rear engine alone. If both gearboxes are shifted together, the two shift levers one behind the other, which are located at the front right next to the driver, must be gripped and shifted together with the right hand. If, on the other hand, you only want to drive with the front engine, leave the rear shift lever in neutral and after disengaging the shifters use only the front lever for shifting. The reverse is the case when driving with the rear engine. Make sure that the engines are running at same revolutions as possible when idling. However, the speed of the rear engine may be somewhat higher than the front engine because this engine is more heavily loaded on steep inclines due to the shift in weight. The clutches of both machines must be set evenly in any case, otherwise when starting off in difficult terrain or in very steep inclines, i.e. where one engine is not sufficient, the clutching engine is thrown off and then the other one stops.
The engines are started by the electric starters. It does not matter which engine you start first. If you don't drive too fast on good terrain or on the country road, the best thing to do is drive with one engine. On long stretches it is advisable to use the two engines alternately so that the wear remains constant on both. Just before you get into difficult terrain and you need to drive with both engines, it is best that they are both as warm as possible. The standing engine can also be bump started while the vehicle is in motion. To do this, switch on the ignition, pull the starter flap on which the running engine is switched. After engaging again, the second motor will start after a few revolutions. It is advisable to only start the second engine in third or fourth gear when driving slowly.
The four-wheel steering is only to be used in the field or if it is only to be steered with the front wheels, since the vehicle then steers better. (to switch see under "steering"!).
Driving the off-road vehicle only with front wheel steering presents absolutely no difficulties on the road or on good terrain. However, it is best the driver first gets used to driving with double control, because when driving a curve to the left, for example, the front half of the car swivels to the left, while the rear half goes to the right. It is therefore very important to always take the wheel very quickly in very narrow passages, because otherwise the car can easily get stuck in the opposite direction.
The pulling power (torque) of both engines is very large. It is therefore not necessary to drive at full throttle in difficult terrain or on steep gradients. It is highly recommended to tackle heavy obstacles with the minimum throttle necessary so that there is always a reserve for unforeseen circumstances. The engines would also suffer rapid and unnecessary wear if the speed was too high. However, with steep gradients, care must also be taken that the speed of the motors is not let sag. It is necessary to shift down to the next lowest gear in good time to maintain revs.
After standing for a long time, especially in the cold season, the copper slats in the clutch basket can become stuck to the solidifying oil. In this case, it is practical to first insert the 1st gear with the brakes on and the engine running at idle speed with a short push. The slats will then suddenly come loose. Then, if necessary, restart the engines.
In the case of descending steep, long gradients of over 35 to 40 percent, both engines must be engaged in first gear to relieve the brakes. The braking effect can be increased by switching off the ignition of the rear machine.
It is particularly important to note that you should never drive with brute force, but always with calmness and deliberation to get the most efficiency out of the Tempo SUV.

 v
v


No comments:
Post a Comment